In this tutorial we are going to learn basics of Selenium IDE. First of all, Selenium is a browser automation tool for testing applications, which can be implemented in various programming languages, including C#, Java, PHP, Python or Ruby. It was developed by Jason Huggins in 2004, and from then it became a popular automated testing tool. It is very flexible and powerful tool, which can help you make test tasks/cases, which will ensure that one or another part of your application is working properly.
So what is Selenium IDE after all?
Selenium IDE is a fully integrated development environment implemented as extension, currently (developed and supported by Selenium creators) on Mozilla Firefox browser. This is one way of using Selenium and prefered for beginners, as it do not require for writing your own testing code in your application and also it has better learning curve in my opinion, because it is easier to debug if anything goes wrong in automation tasks, uses all available selenium commands and you can see everything in your actual browser when Selenium IDE ‘robot’ will be doing described tasks as we will see later.
Install Selenium IDE
Okay then! Let’s install Selenium IDE extension in our browsers. Currently as I am writing this tutorial the download link is here http://www.seleniumhq.org/download. Find Selenium IDE section, and click on latest stable version (now is 2.9.0), also make sure you’re using Mozilla Firefox browser when installing.
Introduction to using Selenium IDE
Now let’s open up what we have installed. Go to Firefox Menu -> Developer -> Selenium IDE.
Here’s how it looks like on 38.0.1 version Firefox version:
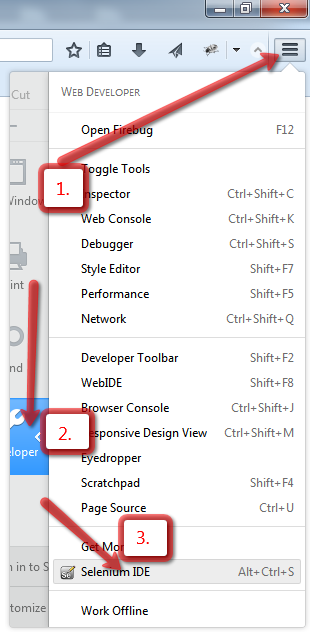
Or just simply use shortcut Alt+Ctrl+S to open it up quickly.

Now let’s break down some major parts of Selenium IDE window:
- ‘Fast-slow’ slider where the pace of the tests can be defined.
- This button will run all test cases that are on the left ‘Test Case’ panel in order from up to down.
- This button will play only selected test case.
- This button will stop executing test cases.
- This record button will record your actions on your browser and automatically write selenium commands.
- This ‘table’ panel contains the creation of commands and commands themselves for selected test case.
- This ‘source’ panel contains XHTML source code for selected test case. Selenium IDE provides tests in a DSL (Domain Specific Language) called Selenese.
- This area contains all commands for specified test case.
- Command input is for typing Selenium command. Also you can choose from dropdown, which contains all the commands available.
- Target input mostly specifies the target you want command would execute on.
- Value input mostly specifies the value for example of input element in the browser, which you want to fill in.
- Log shows the history of your commands excutions. Here where the debugging will take time, it will show successes and errors.
- Reference panel shows description of command, choosed in Command input above.
There are other options in Seleniu IDE window, but stated above are options that I use the most.
Making Selenium cases(tasks)
Now let’s create our test case as follows:
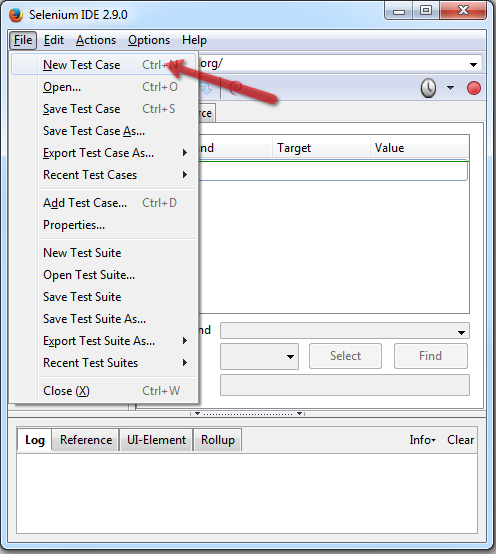
A new ‘Untitled’ test case should appear. Let’s rename it to ‘First selenium test’, it is in: right click on ‘Untitled’ test case->Properties…->Title input.
For this tutorial I made a basic form where we will make test. The reason why we will test on form, is because basically testing covers mostly forms, let it be a login form, contact form, order placement form, etc., where some more complex funcionalities will run in the backend. Of course tests can be done on various UI elements, but as I stated earlier, you will want to test forms the most. So let’s open up the form page I created:
It’s a simple form where if you fill all fields and click to submit, you will see success message and if at least one field will be empty, it will show error message.
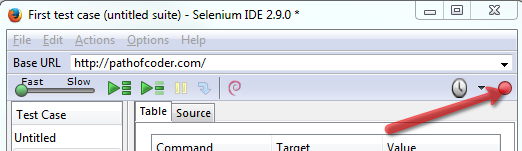
Now let’s record our interactions with this form:
- Press the red circle ‘Click to Record’ button on top right.

- Fill the form as a user normally would.
Selenium IDE window should look like this:
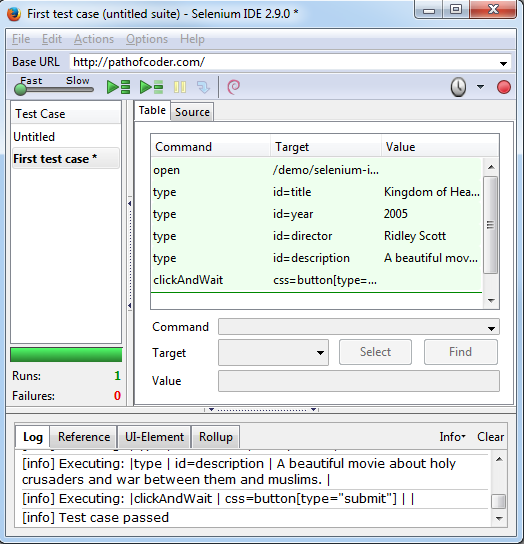
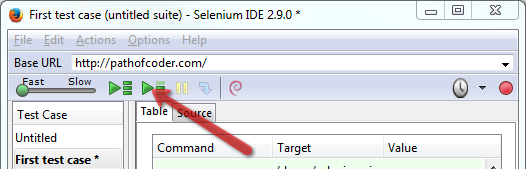
Now to playback our test, press ‘Play current test case’ button:
And that’s it, we created a simple selenium test, which took our actions and produced selenium commands.
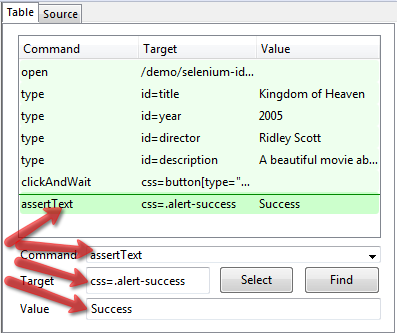
Let’s take one step further: when we correctly fill the form, we want to see success message. For that we can manually write needed command called ‘assertText’:
Now this same test case will ensure that the form is working correctly. If for example after submission of form would occur some error in the backend, like exception or, in production, same old blank page with 500 server error message, the test case would fail and stop further execution. Also all the details where and why it has failed could be seen in Log panel.
Let’s break down commands we used:
- type: a command to fill form elements like input of text type or textarea. Target section is basically a locator of the element, in this case, of input, and the Value section contains the value to be filled in the element specified in Target section.
- clickAndWait: a command to click an element and wait for page to reload. There is a command called jut ‘click’, and the reason why Selenium produced ‘clickAndWait’ command when we subitted the form, is because it tells to current test case to wait when the page fully reloads, and only then continue other commands, otherwise it would continue to other commands and of course it would fail. Target section is, again, a locator of the element to click on, and as we see, there is no need to specify Value section, because we don’t fill something, we only want to click on element.
- assertText: a command to assure that a certain text is present on the page. There is an alternative to assertText, called ‘verifyText’ command. Main difference of these commands would be that ‘assertText’ if fails to find a specified text on the page, test will stop it’s execution, but ‘verifyText’ will not stop the execution of test case. So we mostly want to stop further execution, because if test fails somewhere, we need to fix that first. Target section is where we specify an element which contains the text we want to assert, but it is not required. The Value section contains the text we want to assert, and if we leave Target section blank, Selenium ‘robot’ will search all the page to find specified text, so obviously we would want to help and write the locator of element where the text lying. Note: sometimes you may need to assert just part of text, because if for example a located element has ‘Selenium is a great tool’ text, and in Value section we write down ‘great tool’, it will fail, so in this case use asterisks – * around the text, like so ‘*great tool*’. Just a tip to keep in mind.
There are much more Selenium commands out there, so use this page as a reference next time you will be writing your own tests – http://release.seleniumhq.org/selenium-core/1.0.1/reference.html.
Selenium Locators
There are several ways how to locate an element. I most commonly use these:
- css Locator
- ID Locator
- XPath Locator
Css Locator
It selects elements exactly like in css file. It is flexible and easy enough, especially if you know css well.
Example: css=div input.input-class
ID Locator
It selects elements by ID.
Example: id=elementId
XPath Locator
XPath Locator may sound to you a complex method to select an element, and indeed it is if you hear it for the first time… but for me, it’s the most flexible way of locating an element. XPath basically is a language for selecting nodes in XML document. For example elements can be selected by text and part of text, what css can’t do, and this is pretty powerful. It’s not a small topic to discuss, so just keep in mind if you will struggle selecting a super-hard-to-select element with css Locator, there probably is a way using XPath.
Example (select input based on it’s label): //label[text()='Movie title:']/following::input
So simply said Selenium IDE is a great tool to ensure both yourself and your client, that most parts of the website is working as it should.
If you think this tutorial was helpful, or have a question to ask, let me know below in the comments.